Wiring Fluorescent Lights
If you don't have a fluorescent light for your marquee or just want to replace the one you have, there are a couple of choices. You could buy an assembled fixture, fix the one you currently have or make your own. Assembled fixtures tend to be quite expensive because they come with a lamp
holder and are ready to mount. You may not be able to find one the exact size you need and you may have difficulty mounting it. Using an existing fixture is a good idea if you have one. Hopefully the ballast and starter are OK, or you could end up replacing them after you blow a couple of bulbs.
Making your own fixture gives you maximum flexibility but it does require a little effort. This guide is for anyone who wants to make their own fluorescent fixture. It’s really quite simple and takes about 5-10 minutes. The materials needed are available at Home Depot, Lowe’s and other home improvement
type stores. They should total about $8-10, depending on whether you already have some wire, lamp cord, lamp or starter sockets, etc. You will need:
| A ballast capable of handling 20 watts |
about $2-3 |
| A starter (FS2) |
about $.95 |
| A starter socket |
about $.95 |
| A set of lamp holders/sockets |
about $2 |
| A fluorescent light (20 watt) |
about $2.50 |
| Some 14 gauge solid core wire |
about $2.00 |
| (Optional) A wall plug or extension cord |
about $2.00 |
If you’re not sure how long the fluorescent light should be, measure the inside of your cabinet. Subtract ½ inch (usually) and find a light of that length or less. Stranded wire can be substituted for the solid core wiring, but you may have to tin the ends if your lamp sockets have quick connect
fittings.
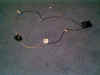 Previous wiring
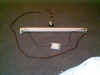 New wiring
Use the wiring diagram below as a guide to assembling your fixture. If you’re not sure where to start, you can follow this step by step procedure.
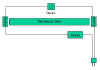
- Cut the end from the extension cord (if your using one) so you’re left with just the plug and wire.
- Because extension cords have stranded wires, strip one end, twist the wire and tin it with solder.
- Connect the tinned wire to the near side of the right lamp socket (as you’re looking at it). If you have quick connect sockets, just push the wire in.
- Strip the other wire of the extension cord and solder it to one of the ballast wires. The ballast wires will probably be solid core while an extension cord is stranded. Do your best to fasten the two together and solder them. Before doing this, you may want to slide of piece of heat shrink tubing onto the
wire. Otherwise you can cover the joint with electrical tape when you’re finished.
- Place the lamp sockets onto your florescent lamp to determine the required wire length.
- If the wire is long enough, attach the free ballast wire to the near side of the left lamp socket. If the wire is not long enough, you’ll have to solder on an extension piece. If you have quick connect fittings, all you have to do is push the wire in.
- Strip the end of some solid core wire and connect it to the far side of the left lamp socket. Measure enough wire to reach the other end of the florescent lamp and while leaving a little slack in the middle - cut the wire to length.
- Strip the end of the wire and attach it to the far side of the right lamp socket.
- Cut the wire you just connected in half. Strip both ends of the cut wire.
- Attach each wire to either side of a starter socket.
- Insert a starter and light and plug in the fixture. If it doesn’t work, check the wiring.
After you’ve tested the light, attach it into your cabinet and enjoy. |


